The idea of cleaning the SLR camera sensor terrifies many photographers. It may seem very difficult, but the truth is much simpler than it seems. In this guide we will show you how to clean the sensor of a SLR camera to prevent dust spots and stains from appearing on your photos. Know more about donuts maker.
How can dust end up getting inside the sensor? This is a good question and even if you are not aware, every time you change a lens on your camera you are exposing the sensor to dust and dirt. This means that if you don’t want to be cleaning the sensor every so often, and above all, to give your camera a good quality of life, you should worry about trying to protect the inside of your camera as much as possible.
Ideally, you should not change the lens in an environment with a lot of airborne particles (mostly outdoors) such as a beach or the city on a windy day. But obviously it is not always possible to do so, so whether we like it or not, dirt and dust end up settling on the camera sensor, claiming its prominence in each of our photographs. And it is that, this dirt will appear in your photographs in the form of blurred spots , subtle but very present, on the composition itself.
How to know if you have to clean the sensor of your SLR?
Now that we know that dust can settle on the sensor, we should not fall into continually cleaning the sensor or, on the contrary, not do it because we do not see these “stains” in our photographs. So, we are going to give you some tips so that you are clear about when is the ideal time to clean the sensor of your SLR camera. You might be interested in donuts recipes for donut maker.
- Set your camera to a small aperture like f/16 of/22.
- Set your camera to the lowest ISO.
- Take a picture against something bright white (like a white wall, a piece of paper, or a cloudy sky) and gently move the camera as you take the picture. This will help you blur the photo and make the dust look better.
- Next, to check for dust, upload the image to your computer and check it thoroughly
- If you see signs of dust then you know you need to clean the sensor.
What you should know before cleaning the sensor of your SLR
Cleaning the sensor of an SLR camera is something that must be taken seriously and carefully. So, here are some very important tips before we start our cleaning. Learn more about fun mugs.
- You may see dust in the viewfinder with the naked eye, but this dust will not show up in your images.
- You may not see dust on the sensor if you use wide apertures, as the depth of field is wide enough to blur these spots.
- You can tell your sensor is dirty when you see the same spots appearing on multiple images in the same places.
- You may see that the camera mirror is dirty and although this dirt will not appear in the image, we must remove it with an air blower (never with compressed air)
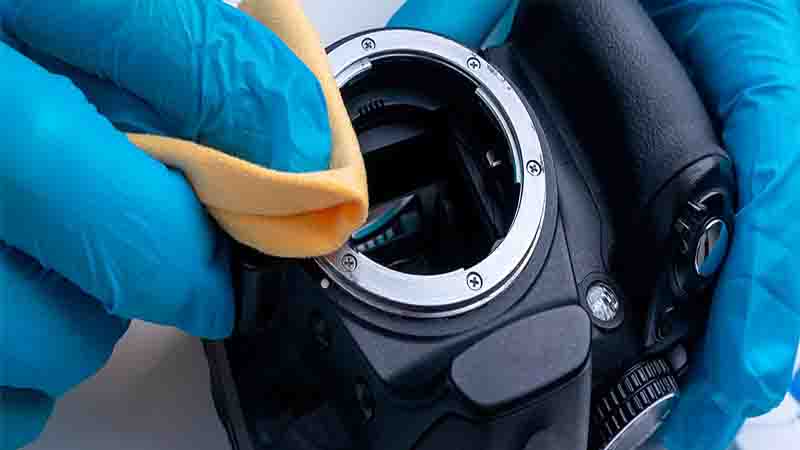
- When cleaning your camera, do not touch the mirror or the sensor with anything other than products specially designed for cleaning, as both parts are extremely fragile and are very easily damaged, scratched or marked.
Steps to clean the sensor of a SLR
First of all, did you know that there are SLR cameras that have an automatic sensor cleaning mode ? If you don’t know, check the technical characteristics of your camera in search of this function (not all of them have it) and use it. In fact, some cameras do this automatically when you turn them on or off. IMPORTANT! Make sure your camera battery is fully charged as it may shut down mid-cleaning and damage the sensor.
Knowing that we must be careful with how and when we change our lenses, it is time for us to teach you how to clean the sensor of your SLR camera step by step. Starting by telling you everything you will need during the process.
Estimated time: 15 minutes
What will you need?
- Lint-free cleaning swabs (ear swabs do not work)
- Solution for cleaning the camera sensor.
- Manual or knob air blower.
- Flashlight or headlamp to be able to see inside the chamber.
If you don’t have any of the things on the list, the easiest thing to do is buy a professional DSLR or SLR camera cleaning kit. You can find them on Amazon or in specialized stores and they are quite cheap (and essential if photography is your favorite hobby).
dry cleaning
- Find an area as free of dust and wind as possible.
- With a full battery and no lens on your camera, look to see if there is an option in the menu that allows you to clean the camera manually.
- When you select this mode, you will hear the mirror lock back, exposing the sensor.
- Hold the camera upside down (with the LCD screen facing the ceiling) and blow the air blower several times over the sensor without touching the sensor with the tip of the blower.
- Turn off the camera, reattach the lens, and take another test shot to see if the dirt has been removed or gone.
If with this the sensor of your reflex camera has been cleaned, you do not need to do anything else. But if, on the other hand, you still see dirt when doing the tests, it is likely that you will have to go on to do a “wet” cleaning of the sensor.
With sensor cleaning fluid
- Remove the lens and place the camera on a flat surface with the LCD screen facing the ground.
- Select the manual cleaning option to block the mirror.
- Take out a cotton swab and use the air blower a few times to remove any strange bits of lint that might be stuck to the cotton swab.
- Add two (or three drops maximum) of sensor cleaning solution to the tip of the swab.
- Very carefully place the swab on one side of the sensor and, without too much force, gently move it across the sensor from one side to the other.
- Turn off the camera, reattach the lens, and take another test shot to check for dust.
If after doing all this you see that there is still some powder left, you will have to repeat the process, using another new and clean swab. If you don’t see dust, but you do see streaks on the sensor, it means that you have used too much sensor-cleaning solution. Wait about five minutes and repeat the cleaning process but with less solution this time.
If you have followed our step-by-step guide, you will now have the sensor of your SLR camera totally clean . And it is that, when done correctly and with the right equipment, cleaning the camera sensor is not complicated at all. Although it may seem like a bit of work the first time you do it, in the long run you will be saving hundreds of stained photos, the expense and inconvenience of using a professional cleaning service and above all, you will be extending the life of your camera. We hope that this guide has been useful to you, if you have more questions, let us know in the comment box.